How to Add a WordPress Language Switcher to Your Multilingual Website

[ad_1]
Turning your WordPress website multilingual can be a great way to reach new audiences. It’s also one of the top methods to make sure that you always present your content, offers, or services in a language that matches the reader’s preferences hand-in-glove. There’s just one problem with that – or a challenge, rather – how to actually add a language switcher module to your WordPress website?
This is what we’re here to show you today. What follows is a quick beginner’s guide to website language switchers. We’re going to explain what a language switcher is, what it actually does, what the main types of language switchers are, and how to add one to your WordPress website.
What is a website language switcher?
Simply speaking, a website language switcher is an item such as a drop-down menu, link, or button, typically in one corner of the page’s structure.
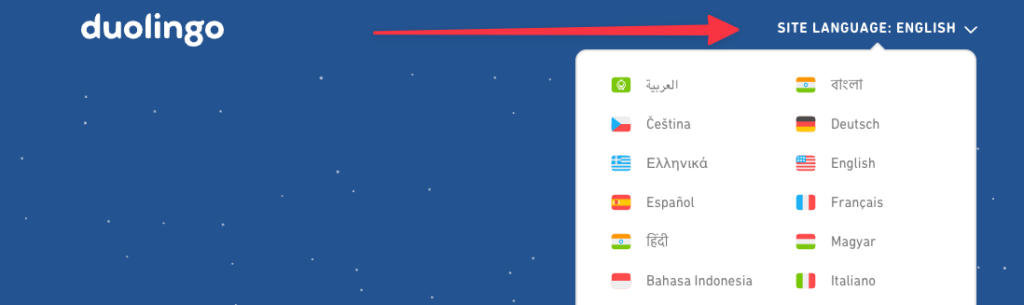
For example, it can be something like this:
The switcher enables the reader to change the language of the site’s content to one that suits them better. This can be incredibly helpful if your site caters to audiences in a handful of countries and you want to provide them with more options than just English.
A language switcher can help foster brand retention, show that you understand your audience’s needs, and can deliver solutions tailored to them.
Types of website language switchers
There’s a handful of language switcher types you can use on your website. First of which you’ve already seen in the example above. ☝️ That demo from Duolingo’s website is a good example of an “icon plus text” language switcher.
Arguably, it’s the best type of language switcher you can use since it presents flags of countries along with the name of the language in writing to make the selection highly scannable and super clear to readers.
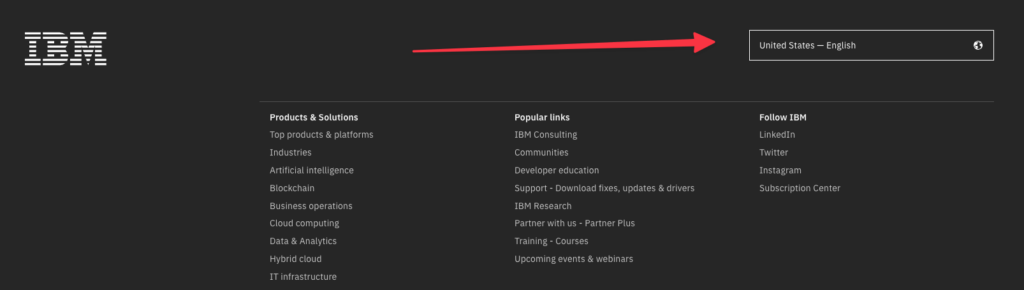
One simplification of this idea is to display text only – simply the name of the language on its own. Such language switchers are usually found in navigation menus or drop-downs. That is because there’s usually not a lot of room for icons in crowded site menus, plus they might overpower the rest of the menu.
Here is an example of a text-only language switcher:
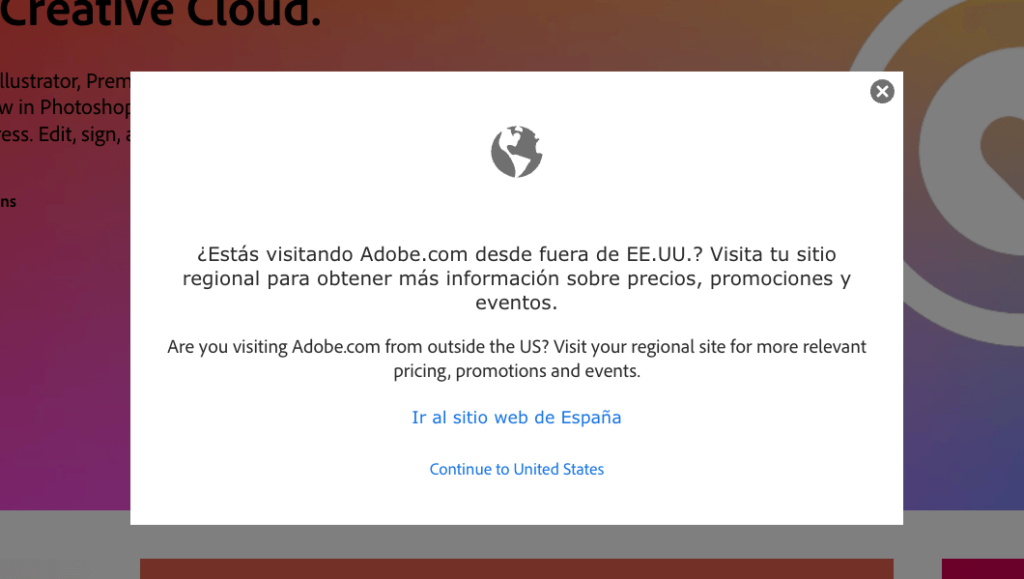
The next type of language switcher is the full-page website language switcher. The idea behind it is to not let the reader pass through until they decide and pick a specific language.
A restriction like that is often needed on sites that are bound by law to limit some of their services or restrict them to certain areas. This sort of language switcher controls not only the content language itself but also the whole localization of the site.
Here’s an example of a language switcher like that:
Benefits of making your site multilingual
Before you can add a language switcher to your website, you’ll need to make that site multilingual. The whole “making it multilingual” means that you’re simply adding other language versions to your site and filling them with content translations.
So it goes: multilingual website first, and then language switchers second. 👍
The benefits of making your site multilingual go way above just the mere fact that you can then put a language switcher on it. Here are some of the key ones:
Reach a wider audience
A study by Statista reveals that only 25% of internet users are native English speakers, while over 50% of all web content is in English. This gap creates a lot of opportunity for businesses that decide to offer different language versions of their sites. As of January 2023, there are 5.16 billion internet users worldwide, so the market for non-English content is quite huge to say the least.
While there are products and services that can only be offered in certain areas, humans generally have similar needs when it comes to content consumption across the world. Having a multilingual website thus can help you reach new and potentially lucrative markets in non-English-speaking countries.
Plus, even in countries where English is the native language, like the United States, you’ll find sizable communities that speak languages such as Spanish, French, Mandarin Chinese, and more. A multilingual website can therefore expand your business to people of all languages, both domestically and internationally.
Better multilingual SEO
Not every website owner knows this, but there’s something called multilingual SEO. To give you the “in the nutshell” brief, Google basically presents different search results based on the language set in the user’s system and browser.
Plus, interestingly, ranking for certain terms in English is way harder than ranking for them in Spanish or German. Once you add the fact that you might indeed have a good reason for reaching those international audiences, then dabbing into multilingual SEO is a very good idea.
In simple terms, you want your content to be found regardless of the language in which the user enters the phrase into Google.
Making your site multilingual and also making sure that the content is all well optimized and crawlable by Google is a great investment.
Reduce bounce rate and increase conversions
CSA Research surveyed 8,700+ online consumers in 29 countries and found that 76% of them prefer purchasing products with information in their own language.
What does this mean in practice? For once, it means that there are lots of people who will leave your site immediately if they can’t find their preferred language version on it. Or, rather, they will go to a competitor who has that language version.
Similarly, making your site multilingual gives you an edge over the competitors who didn’t make this move.
Best practices when using a website language switcher
With the “why” out of the way, let’s now list some things to keep in mind when designing the language switcher for your site:
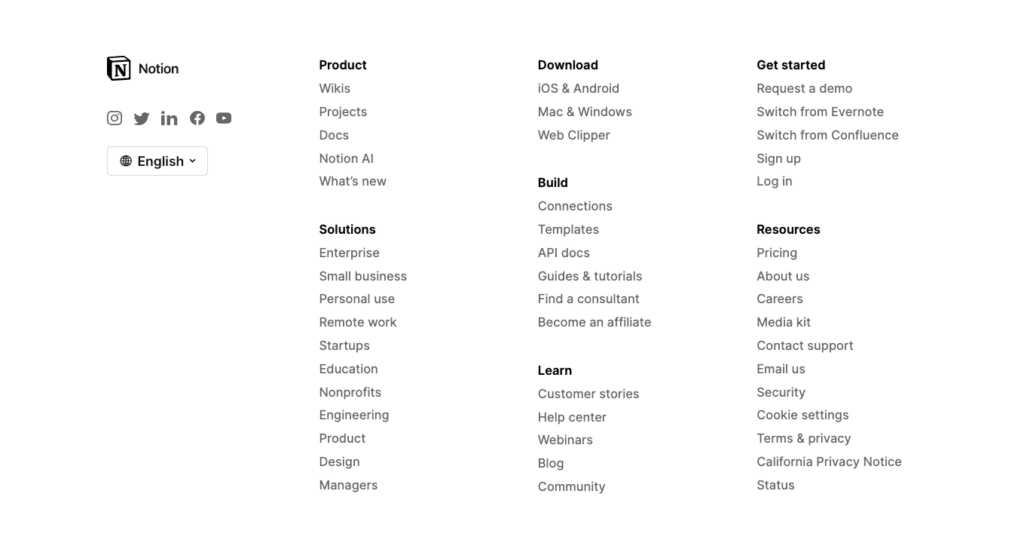
Place the language switcher in a visible spot
The standard for language switcher placement is usually somewhere in the top-right corner – next to the main menu of the site, or in the footer. An example from Notion:
Or, alternatively, a lot of sites opt for displaying a language switcher that floats somewhere near the bottom-right corner and remains visible at all times. Like this one:
No matter what specific placement you choose, the main goal is to make it as easy to find as possible. If someone doesn’t understand the language that the site is in, then the language switcher is literally the first thing they’re going to be looking for.
Avoid using country flags on their own as the language switcher
Flags are great as a language identifier in the most basic cases. However, they’re also excluding big groups of users.
First off, flags alone are not an accessible solution. Meaning, a visually impaired person might not either distinguish between similar looking flags or see them at all.
Secondly, some countries might be home to two or more languages, so it’s not immediately clear which one the language switcher refers to.
For example, the United Language Group points out that though India uses Hindi and English as their official languages, the country is home to 448 unique languages. Using an Indian flag in the language switcher can therefore be confusing for Indian natives as they cannot know which language the flag represents.
Using a flag plus the name of the language is a much better solution. It’s accessible and clear to everyone.

Experiment with automatic language switching
Depending on what type of site you run and what type of content you offer, it might be a good idea to set the language switching operation to be triggered automatically.
The way this works is that your language switching software can detect the language setting of the visitor’s web browser plus their location settings through cookies, and then adapt the site’s content based on that automatically.
This enables your audience to have a seamless experience without having to interrupt their activities by looking for a manual language switcher. Ideally, your site visitors should not have to do any additional work to get the information they need.
At the same time, your visitors don’t lose the ability to switch back or alter the language settings later on.
How to add a language switcher to a WordPress website
If your site runs on WordPress, then adding a language switcher to it – and actually making it multilingual under the hood – is very easy.
To make it work, you’ll need the free TranslatePress plugin. It’s one of the most popular translation and localization plugins for WordPress.
You can get it installed straight from your WordPress dashboard. Simply go to Plugins → Add New and search for “TranslatePress.” Then, click on Install and Activate.
TranslatePress allows you to do a lot more than just add a language switching module to your site. In fact, you can use it to add complete translations of your website content into hundreds of supported languages, optimize for multilingual SEO, plus also enable automatic translations based on tools like Google Translate or DeepL.
But let’s focus just on the plugin’s language switching ability. Here’s how to set that up:
Pick your languages
First things first, you’ll need to select the languages in which you want to display your site’s content. In the free version of TranslatePress, you can pick one additional language. To set this, go to Settings → TranslatePress, and use the section marked in the image:
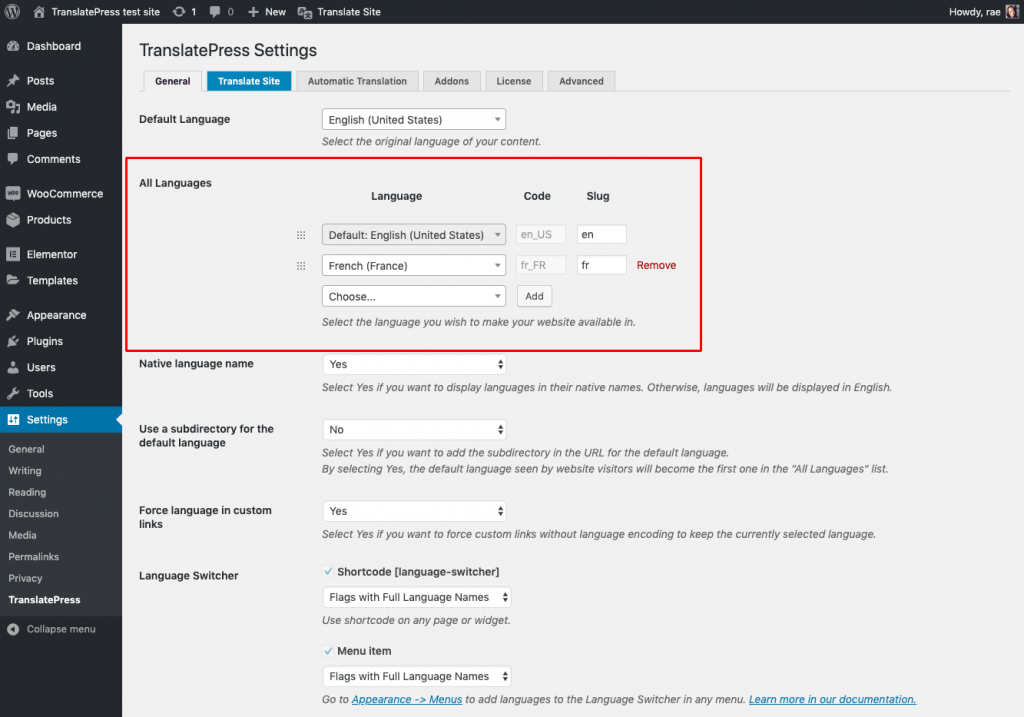
Click on Save Changes when done.
Choose your language switcher
TranslatePress allows you to pick from three available types of language switchers. Actually, you can use all three of them at the same time.
You’ll find those language switchers in Settings → TranslatePress, at the very bottom of the page:
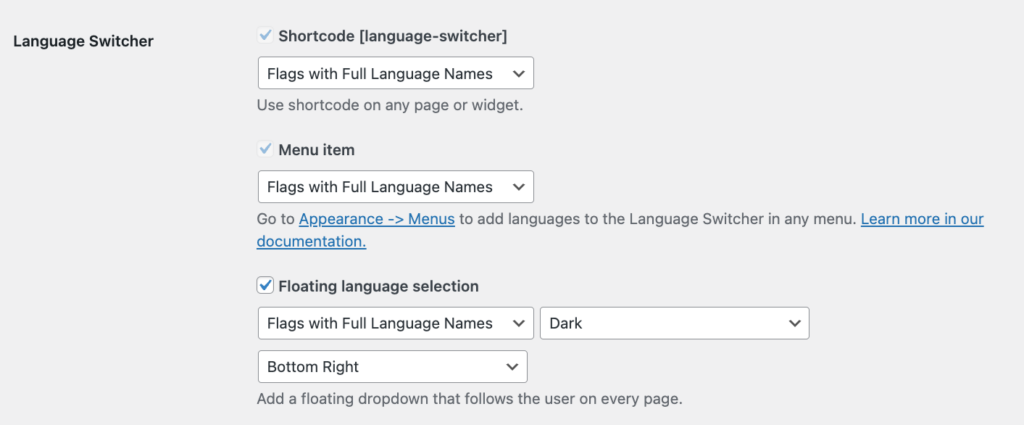
Here’s what they are:
- Shortcode – this type of language switcher is the most versatile since you can include it in any post, page or widget. More info on how to do that below.
- Menu item – quite straightforward, this option allows you to add a language switcher link in your site menus.
- Floating language selection – this is the most fun and customizable type of language switcher. It’s a block that’s going to float next to your site content and always remain visible.
For each of these switchers, you can pick how you’d like them to be displayed. The options are:
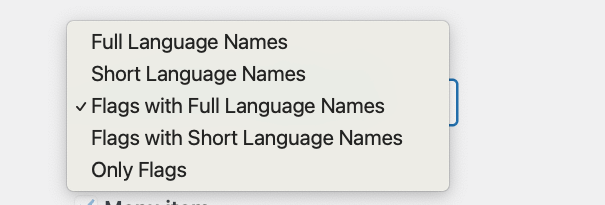
The nice thing is that you don’t have to go for one setting site-wide, but can instead choose to have one type of switcher active as a menu link and another inside a floating block. It’s all up to you!
How to use the language switcher shortcode
As we said above, the shortcode language switcher is the most versatile since you can put it basically anywhere you like.
For example, you can go to your site’s Widgets panel, pick a widget area, and add a shortcode block to it. Like so:
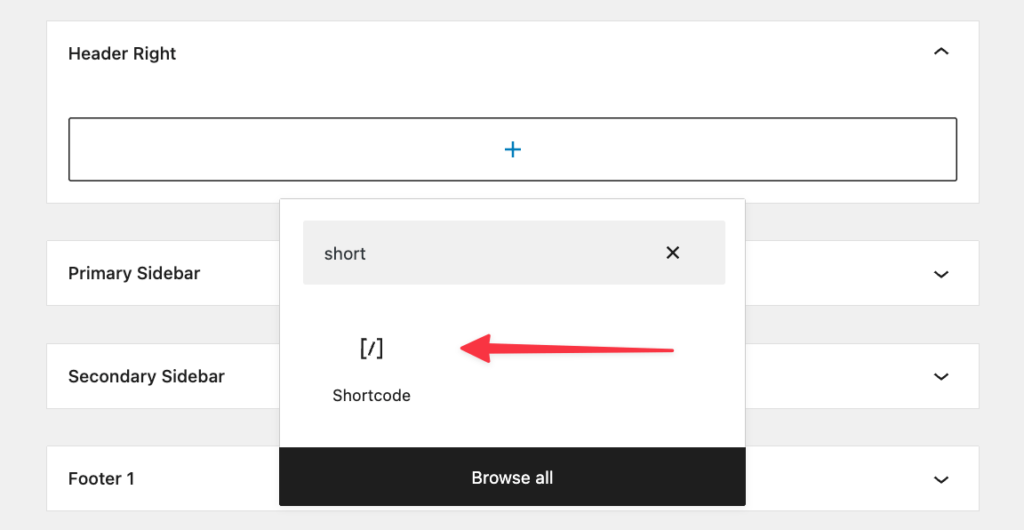
Next, put [language-switcher] in that shortcode block and save the settings.
With that done, you will see the language switcher in action in the specific widget area you’ve added it to.
If you’re familiar with WordPress interfaces and how site menus work, then you’re going to be right at home with adding a language switcher to those menus.
Simply go to Appearance → Menus, pick the menu you want to work with, and then add the language switcher by selecting the options from the list:
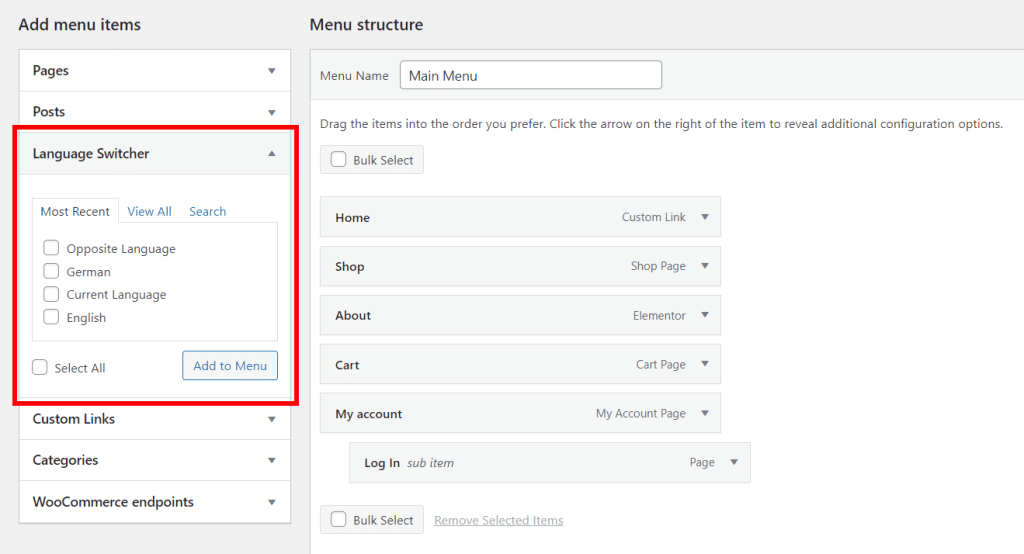
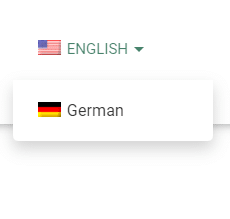
By adding the Current Language as an item to your menu, and then the extra languages as subitems to that, your front end will display a switcher in the form of a dropdown, like so:
Alternatively, you can opt to display the opposite language from the one being shown on the site if you don’t want a dropdown. This only works for bilingual websites, where there are only 2 options to choose from. To do this, add the Opposite Language item to your menu (with no subitems), and your visitors will be able to switch languages with just one click.
Click on Save Menu when done.
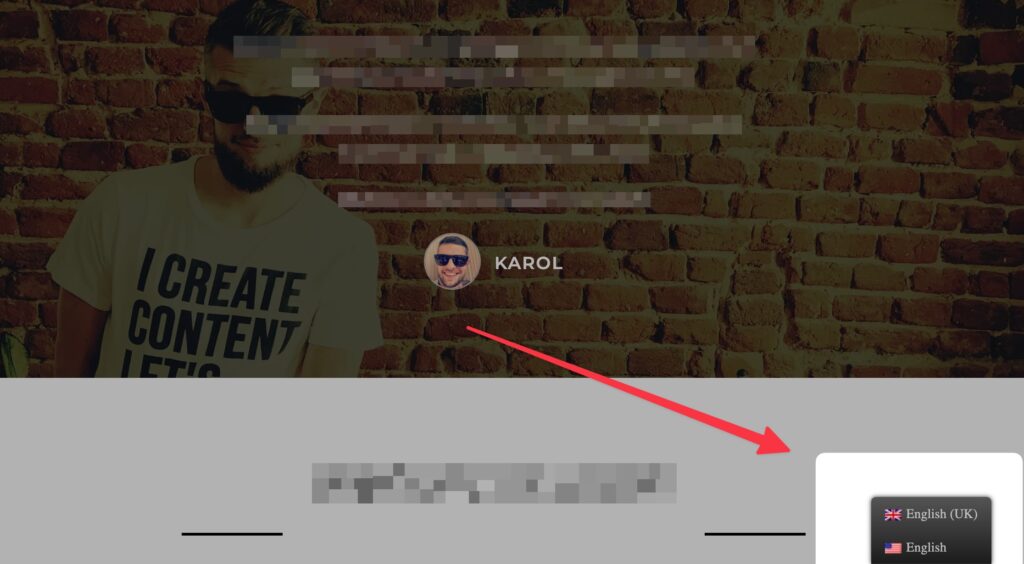
How to add a floating language switcher
This last type of the language switcher is actually the easiest to add… that’s because you’ve actually already done it when adjusting the main options in Settings → TranslatePress. This was the option:
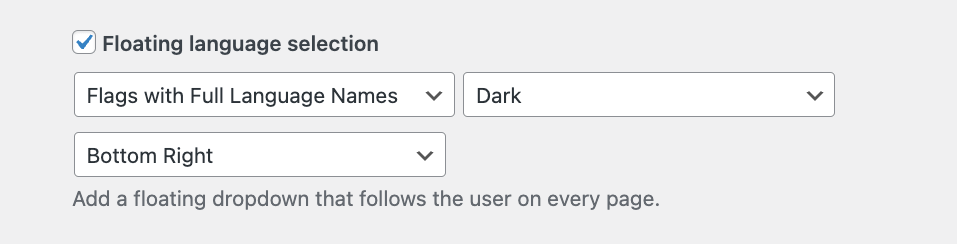
You can use the drop-downs here to select where you’d like your WordPress language switcher to appear and what you want it to look like. You’ll be able to see the switcher in action on the front end of your site, on every page of your website.
What’s next?
That’s it when it comes to how to add a basic language switcher to your WordPress website, but you can actually take it a lot further!
For once, remember when we mentioned you can have the language switch automatically to match the system settings of your visitor? You can do that with TranslatePress add-ons (this one specifically).
If you’re interested in what else you can do to make your site multilingual, let us know in the comments.
Was this article helpful?
YesNo
[ad_2]
Source link