Creating Events and Measuring Conversions in GA4


As a marketing person or website owner, you knew the day would come when you really needed to understand GA4.
And today is that day.
Luckily, your search for knowledge has led you here. So rather than wading through complex tutorials written by analytics nerds, you can wade through this simple tutorial written by analytics nerds! 🤓
If you’re trying to figure out how to set up events or track conversions, stay with us for the next few minutes, and we’ll make it as clear as day.
How Does GA4 Track User Behavior?
As you probably know, GA4 is the latest edition of Google Analytics. It was initially launched in the latter half of 2020 and has now replaced UA (Universal Analytics) as the primary version of the suite.
GA4 represents a significant change in the way we track user behavior. Instead of recording each request to your website server individually, Google now tracks every user interaction across your website or app, along with the context around it.
Every interaction is categorized as an “event”. This means instead of pageviews being their own measurement, they’re just one event of many that you may want to track.

This “event-based model” allows us to build a picture of the entire user journey, from that first click-through to making a purchase.
What Is an Event in GA4?
In Google Analytics 4, an event allows you to track a specific user interaction or occurrence on your website or app.
Examples would include:
- Visiting a specific page
- Clicking a button
- Completing a purchase
- Sharing specific content
- Submitting a form
- Your app crashing
You can analyze each event individually, and multiple events can be bundled into event categories for a higher-level overview.
For anyone familiar with Universal Analytics, events essentially replace pageviews. The main difference is that every user interaction is treated the same way — No predetermined Category, Action, or Label is associated with any event.
What Type of Event Does GA4 Track?
Once you have installed the code snippet, Google Analytics can track an impressive variety of events right out of the box:
- Pageviews – Including navigation around your site or app.
- Scroll – Vertical and horizontal, and the percentage of the page.
- Click – Links, buttons, videos, or any specific position on the screen.
- Session start – Including returning to a session after inactivity.
- User engagement – Such as submitting a form or completing an interactive quiz.
- Video engagement – Play, pause, and completion.
In addition to these metrics, you can build your own custom events for more detailed data collection. You can add up to 500 events to each account.
How to Create Events in Google Analytics 4
Okay, that’s enough for theory — It’s time to make some Google Analytics events for your site.
There are several ways to add events within GA4. Let’s go through each of them in order from the easiest to the most challenging:
Automatic Events
When you first set up a property in Google Analytics, the platform automatically creates some basic events.
Many of these relate to Google products in some way, such as clicks on Google Ads, views of embedded YouTube videos, and app purchases made through Google Play.
However, there are some very beneficial events here:
- first_visit – This triggers when someone visits your site or launches an instant app on Android for the first time.
- session_start – Records when a user first engages with your website or app.
- user_engagement – This event fires whenever a specific page or app is in the foreground for one or more seconds.
- first_open – Records when someone opens your app for the first time.
- app_remove – If you’re tracking an Android app, this event records when people delete it from their device.
You don’t need to do anything to start collecting information here; it’s completely hands-free. Any data that is collected will appear in your event reports automatically.
Default Parameters
Along with the specific data collection mentioned above, GA4 sets several additional parameters for every event:
- language – The preferred language of the user.
- page_location – The URL of the page.
- page_referrer – Where the user came from.
- page_title – The HTML title of the page.
- screen_resolution – The display resolution of the device being used.
These parameters are designed to provide extra contact for each event, allowing you to better understand how various users interact with your website or app.
Enhanced Measurement Events
Want to dive deeper? You can enable Enhanced Measurement.
This feature introduces a wider selection of events that record common user interactions. In some cases, they extend the tracking of automatic events.
Here’s a quick look at all the events covered by Enhanced Measurement:
- page_view – Records when a page is loaded, or an active site changes browser history.
- scroll – Records when a user scrolls down to the bottom of a page.
- click – This records all outbound click events (i.e., towards another domain).
- view_search_results – This event will track it whenever someone uses your site search.
- video_start – Google creates an event that tracks when users start any video.
- video_progress – This measures how far a user has watched a video.
- video_complete – Triggered when a user watches a video to the end.
- file_download – Records when someone grabs any file from your website or app.
- form_start – If someone starts interacting with a form on your site, this event will record it.
- form_submit – Triggers when someone completes and sends a form.
As with automatic events, you don’t have to manually set up Enhanced Measurement events. Instead, you only need to add a data stream within GA4 and enable Enhanced Measurement under Admin > Data Streams > [Your Data Stream].
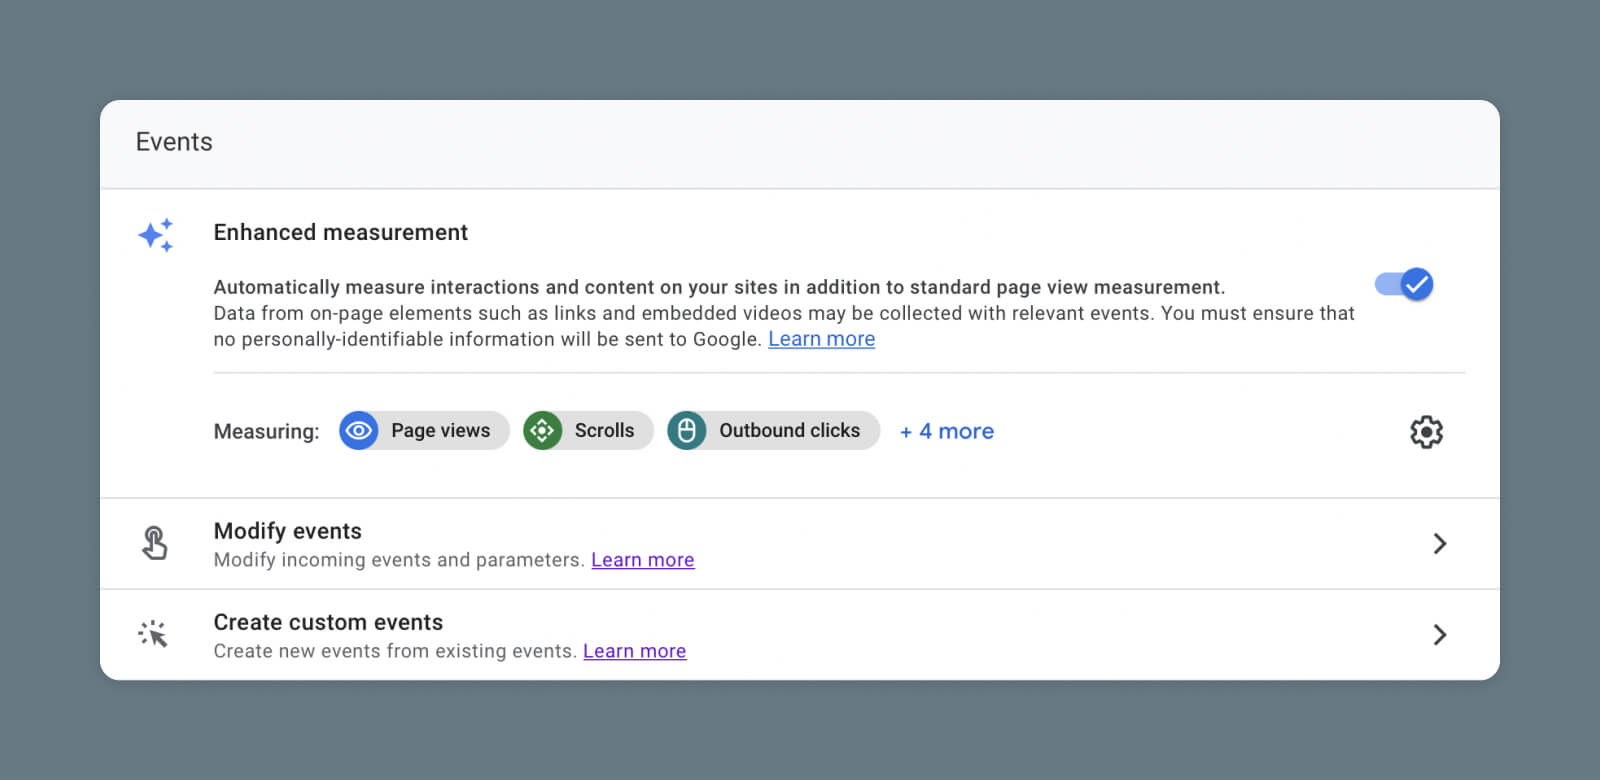
If you want to edit any of these events or switch them off individually, click the cog icon on the right of the Enhanced Measurement section.
Use Cases for Enhanced Measurement
You may have thought about how you could use the various events mentioned above to gain insights about your website or app.
If you’re still looking for inspiration, here are a few examples of how you can utilize automatic events and Enhanced Measurement in the real world:
- Use click events to understand how users exit your site or app and where those outbound links take them.
- Compare form_start with form_submit to see how many people abandon your forms halfway through.
- Check out scroll to monitor how many people read to the bottom of your blog posts.
- Use video_progress to see how long visitors are staying engaged with your videos.
Create New Events in GA4
Once you have set up automatically collected events and Enhanced Measurement, you’ll be rolling in data!
But if you’re greedy for more, GA4 can help you scrutinize your website or app in greater detail. Of course, to make this happen, you will need to create some new events.
Creating an Event
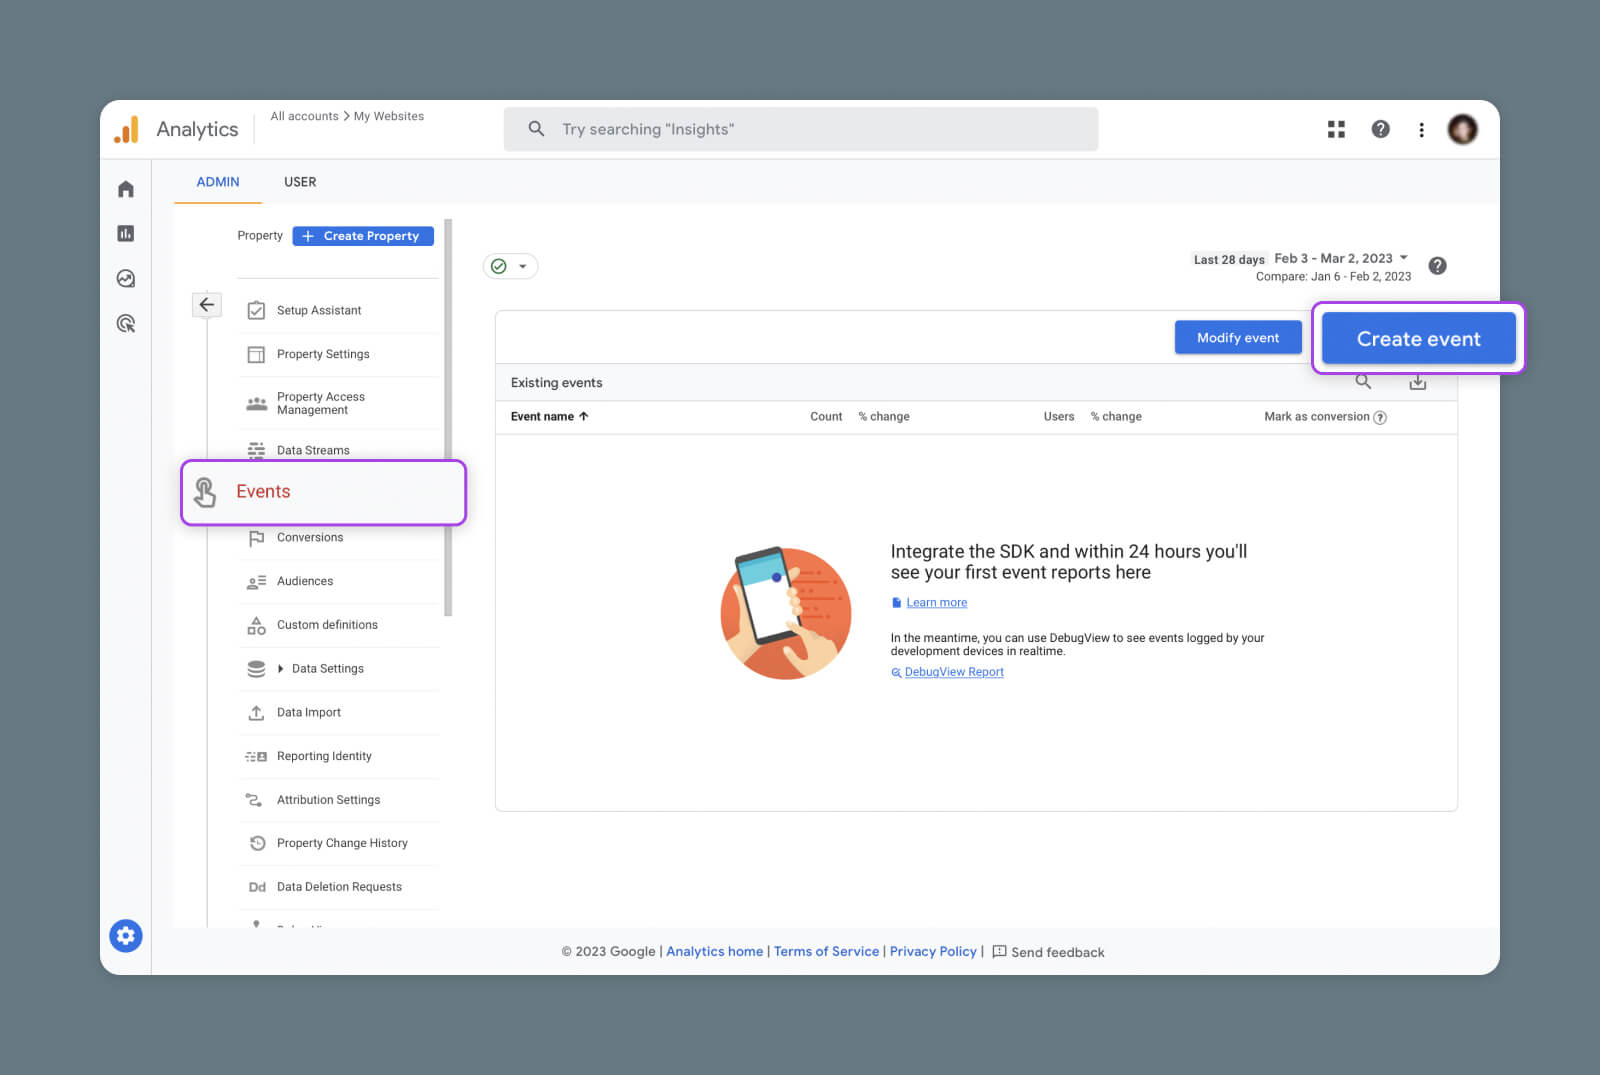
Visit the Admin section of Google Analytics, and select Events under the property you’re working on.
Next, tap the big blue Create Event button in the top right corner, followed by Create in the pop-out menu.
Name Your Custom Event
You should now have the GA4 event creation form in front of you.
There are several fields to fill out here, but we can start with an easy one — your event name.
You can call your event pretty much anything (as long as the event label is unique), but there are a few principles to bear in mind:
- Be descriptive – Choose a name that clearly identifies what the event is tracking, and the original event that you’re tweaking.
- But don’t be too wordy – Long names mean more reading.
- Create your own naming conventions – This will make it easier to organize your data.
- Replace spaces with underscores – Google Analytics only supports letters, numbers, and underscores in event names.
- Consider using a hierarchy – For more complex projects, it’s worth building a hierarchy of events that mirrors the structure of your site or app.
Set Your Matching Conditions
Here’s where things get interesting.
When you create a new event within GA4, the platform makes a copy of an existing event. You can then add your own conditional logic to the original event to target specific data.
For instance, you could copy the page_view event and create a new event focusing on a particular URL.
These rules are called Matching Conditions.
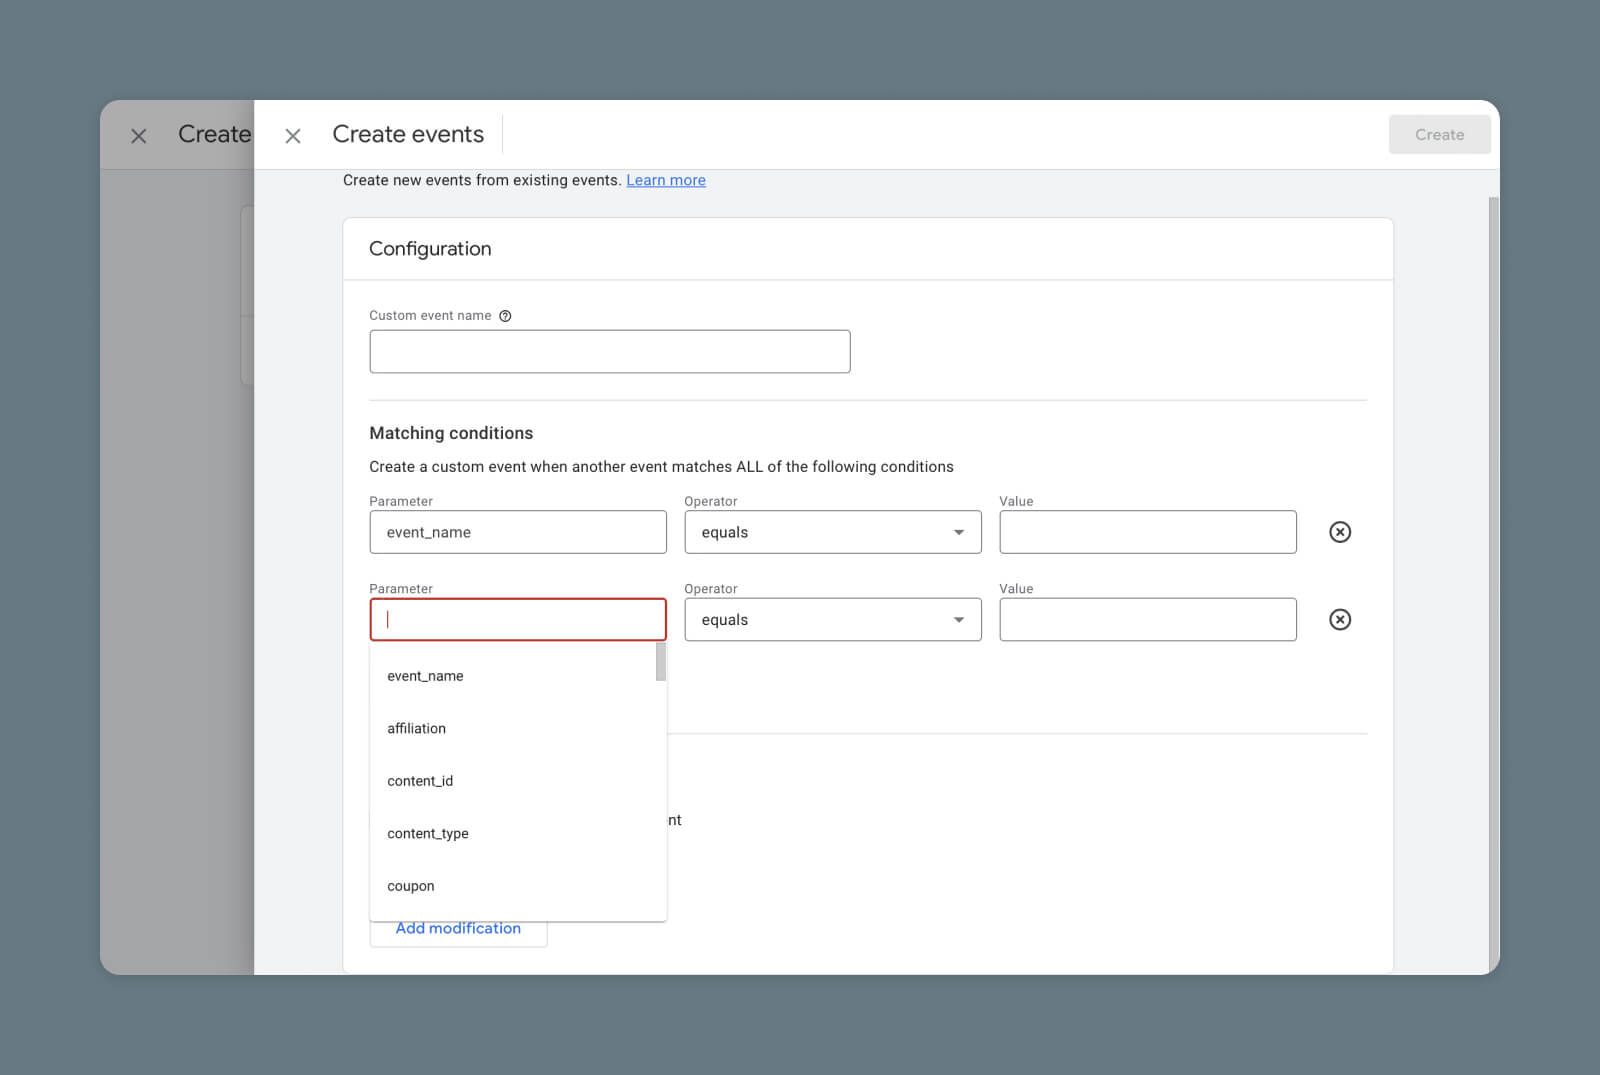
When you set up your new event, GA4 will first ask you to choose the existing event you want to copy. You can make this selection in the first Matching Conditions field.
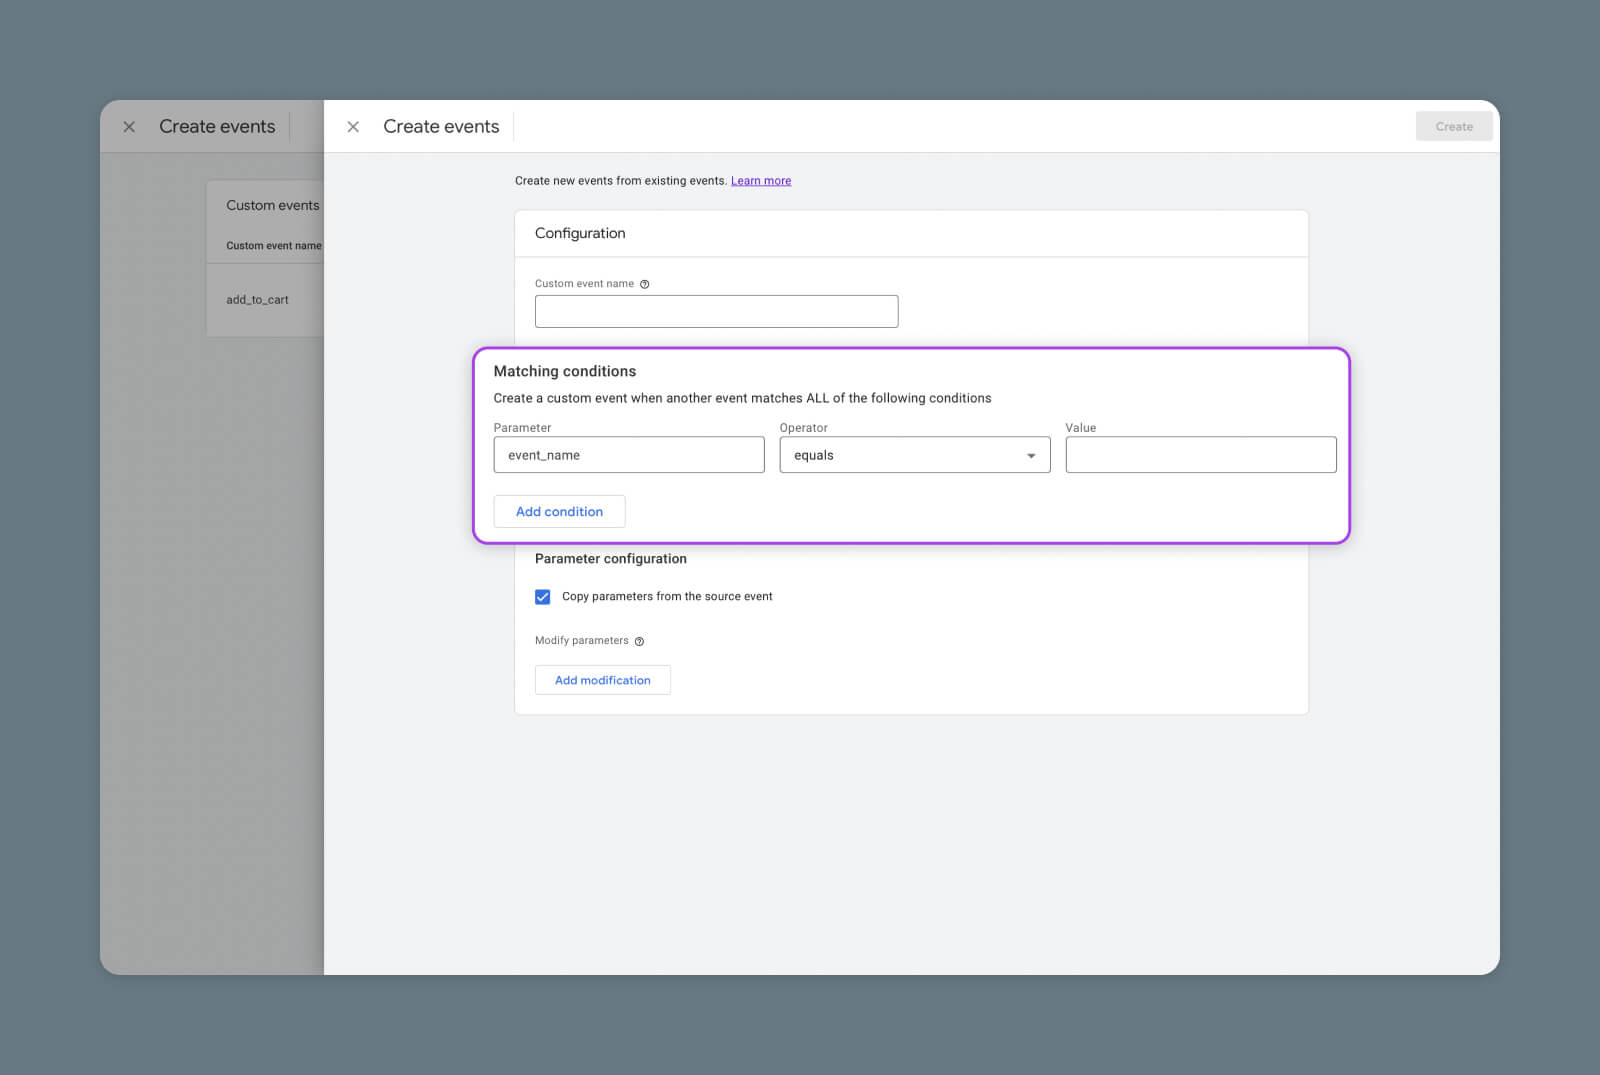
Then, you can choose your new rules for data sorting. Google Analytics provides a generous selection of parameters and operators, and you can input anything in the “Value” field on the right.
In most cases, you won’t need to add many parameters. Just make sure to select the checkbox at the bottom of the form, marked Copy parameters from the source event.
Get Content Delivered Straight to Your Inbox
Subscribe to our blog and receive great content just like this delivered straight to your inbox.
Real-World Example of Matching Conditions
To understand how Matching Conditions work in practice, let’s look at a simple example.
Say you operate an e-commerce store, and want to see when someone registers for an account.
To detect when users sign up, you could create a new event with the following Matching Conditions:
Parameter: event_nameOperator: equalsValue: page_view
Parameter: page_locationOperator: equalsValue: [URL of confirmation page]
This combination will record every time someone views the confirmation page for your signup form.
Test Your New Event
After you choose your Matching Conditions and hit Submit, your new event should appear in the events list for your chosen property.
Job done? Not quite. As Dr. Frankenstein discovered the hard way, it’s a good idea to test your creations before letting them loose.
The simplest way to test new events is by opening up your real-time report and testing the interaction yourself. You can access this option at Reports > Realtime.
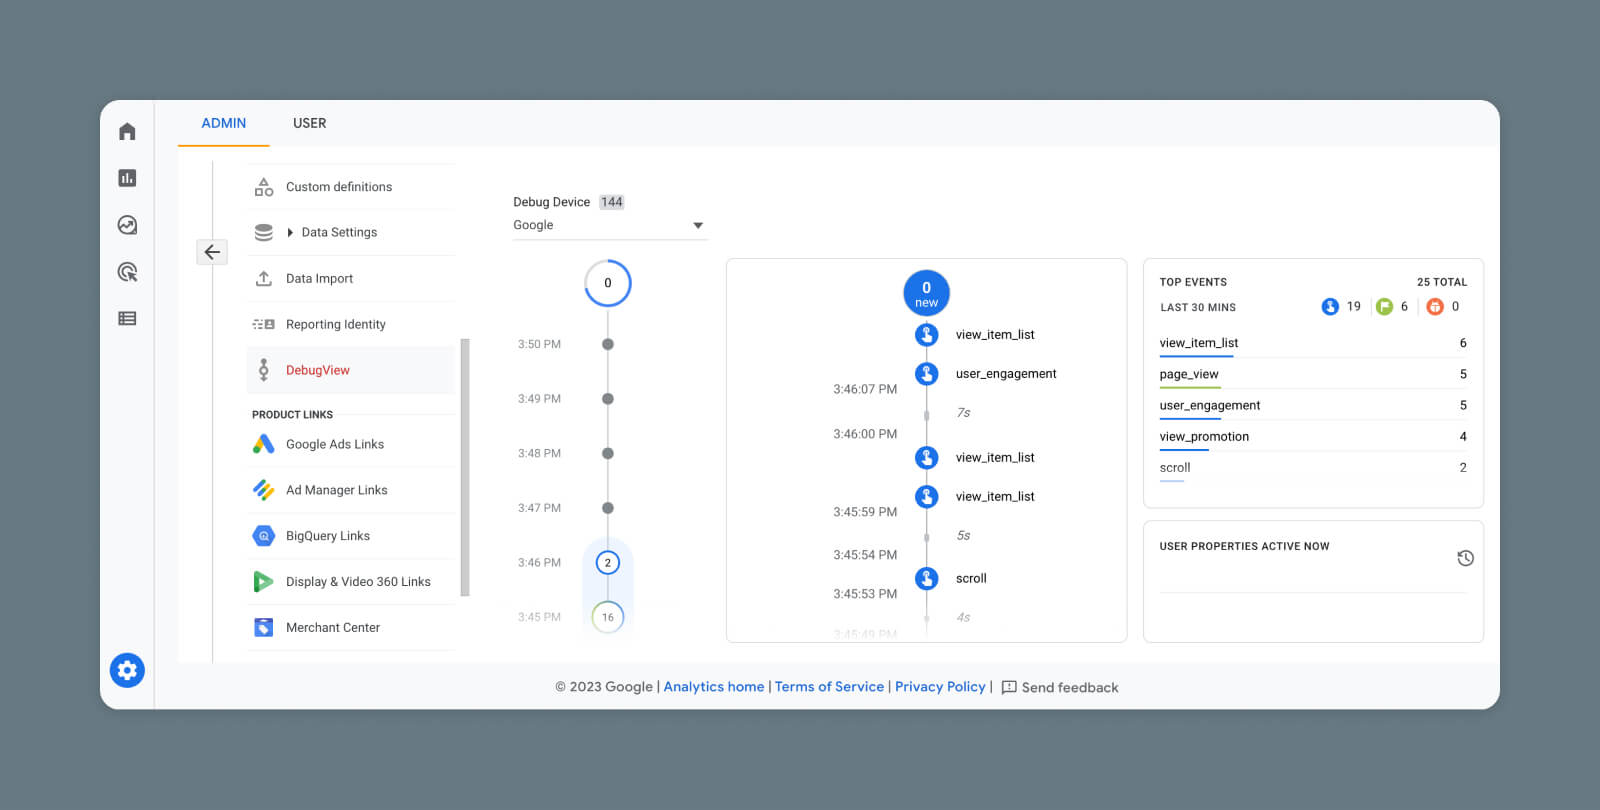
Alternatively, if the event action isn’t easy to test, you can head to Admin > DebugView for a more in-depth view of live interactions.
Adding Recommended Events With Google Tag Manager
If you’re not a technical type, it’s perfectly fine to use the methods above for setting up events in Google Analytics.
However, it’s possible to fill up Google Analytics with more specific data if you’re willing to take a detour via Google Tags Manager (GTM).
Here, you can point Google towards particular elements of your website or app, and track them individually.
Recommended Events
To make this process faster, Google provides a long list of Recommended Events. These are designed to track the interactive elements you can find in most websites or apps.
We won’t list them all here, but some examples include:
- add_to_cart
- login
- share
- unlock_achievement
To add recommended events to your GA4 property, create a tag and trigger for your new event in GTM.
Before you begin, make sure you have set up a data stream and created a Configuration Tag.
Then, to create a new event tag:
- Select Tags > New
- Click in the Tag Configuration box, and select Google Analytics: GA4 Event
- Choose your Configuration Tag
- In the Event Name field, enter one of Google’s Recommended Events
By default, your new tag will track multiple elements on your site. If you want to be more specific, open Event Parameters (scroll down to the “Custom Dimensions” section in this guide to learn how).
Check the Recommended Events list, and input one of the parameters that work with the type of event you want to create. Make sure it matches the parameter name exactly.
As the event value, choose a unique identifier for the element you want to track, such as an HTML class or id.
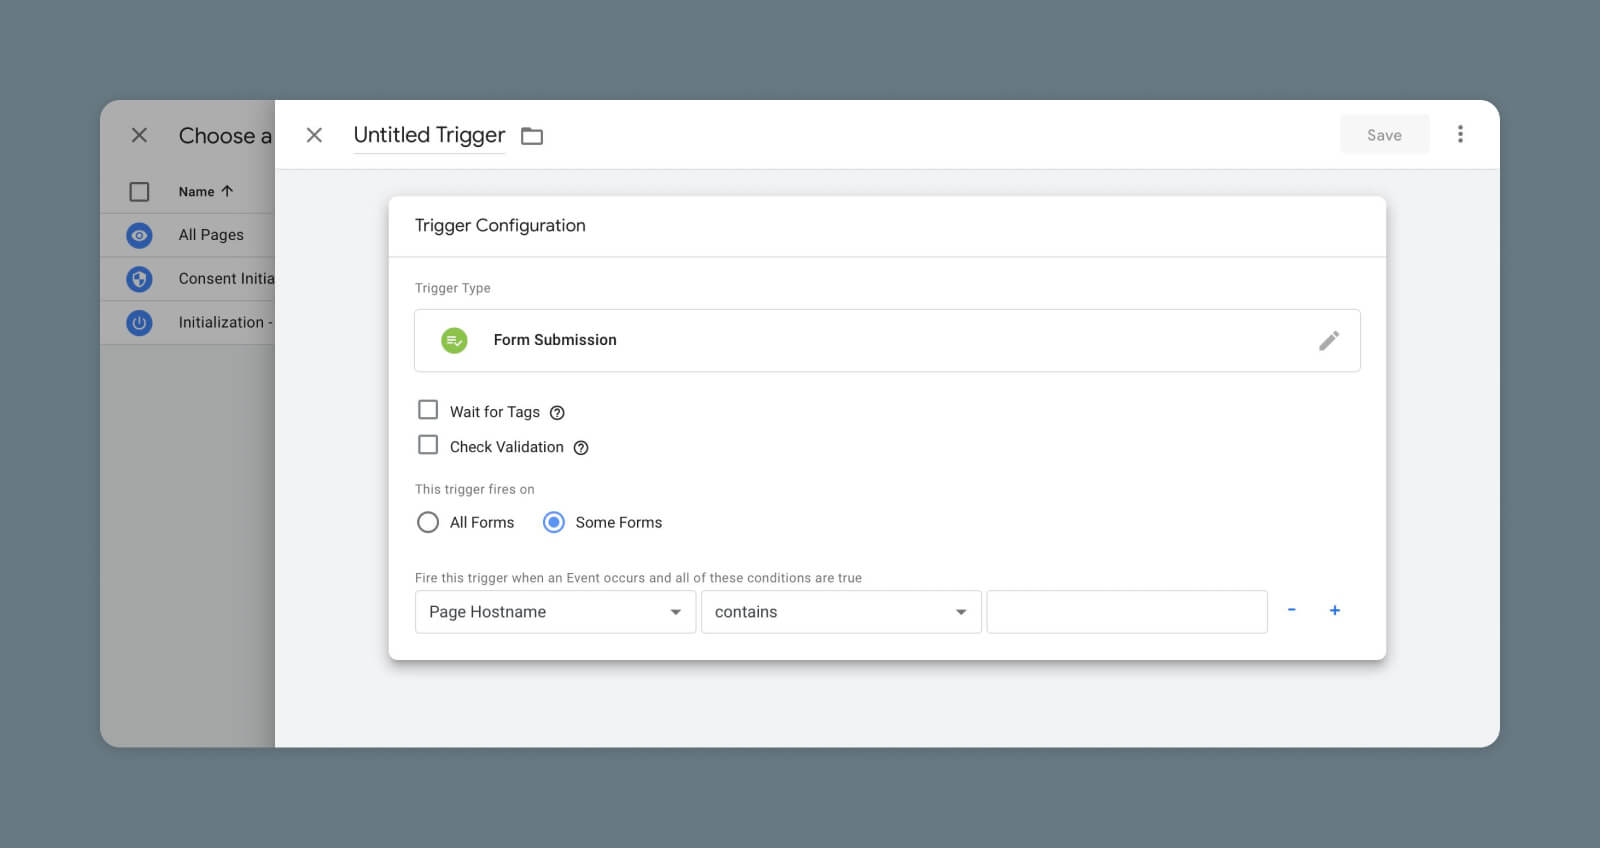
We also need to tell Google which trigger it should be tracking. To do this:
- Click the Triggering box on the new event screen
- Tap the + in the top-right
- Click the Trigger Configuration box
- Choose an appropriate trigger type from the menu
- Add a Trigger Name that matches your event
To be specific with triggers, tap Some <trigger type> and use the built-in parameters to identify the exact interaction you want to track.
It’s also possible to add completely custom events via Google Tag (gtag.js) or Google Tag Manager. But as this requires developer-level expertise, we will leave that to another post!
Custom Dimensions
An easier way to spice up your analytics is by creating new ways to categorize incoming data.
To make this happen, you will need to set up some custom dimensions in Google Tag Manager.
A dimension is essentially an attribute of an event or user. GA4 captures five default dimensions as soon as you set up tracking (see “Default Parameters” earlier in this guide).
However, you can also create your own custom dimensions to track more specific details about events and user properties. Let’s work through an example.
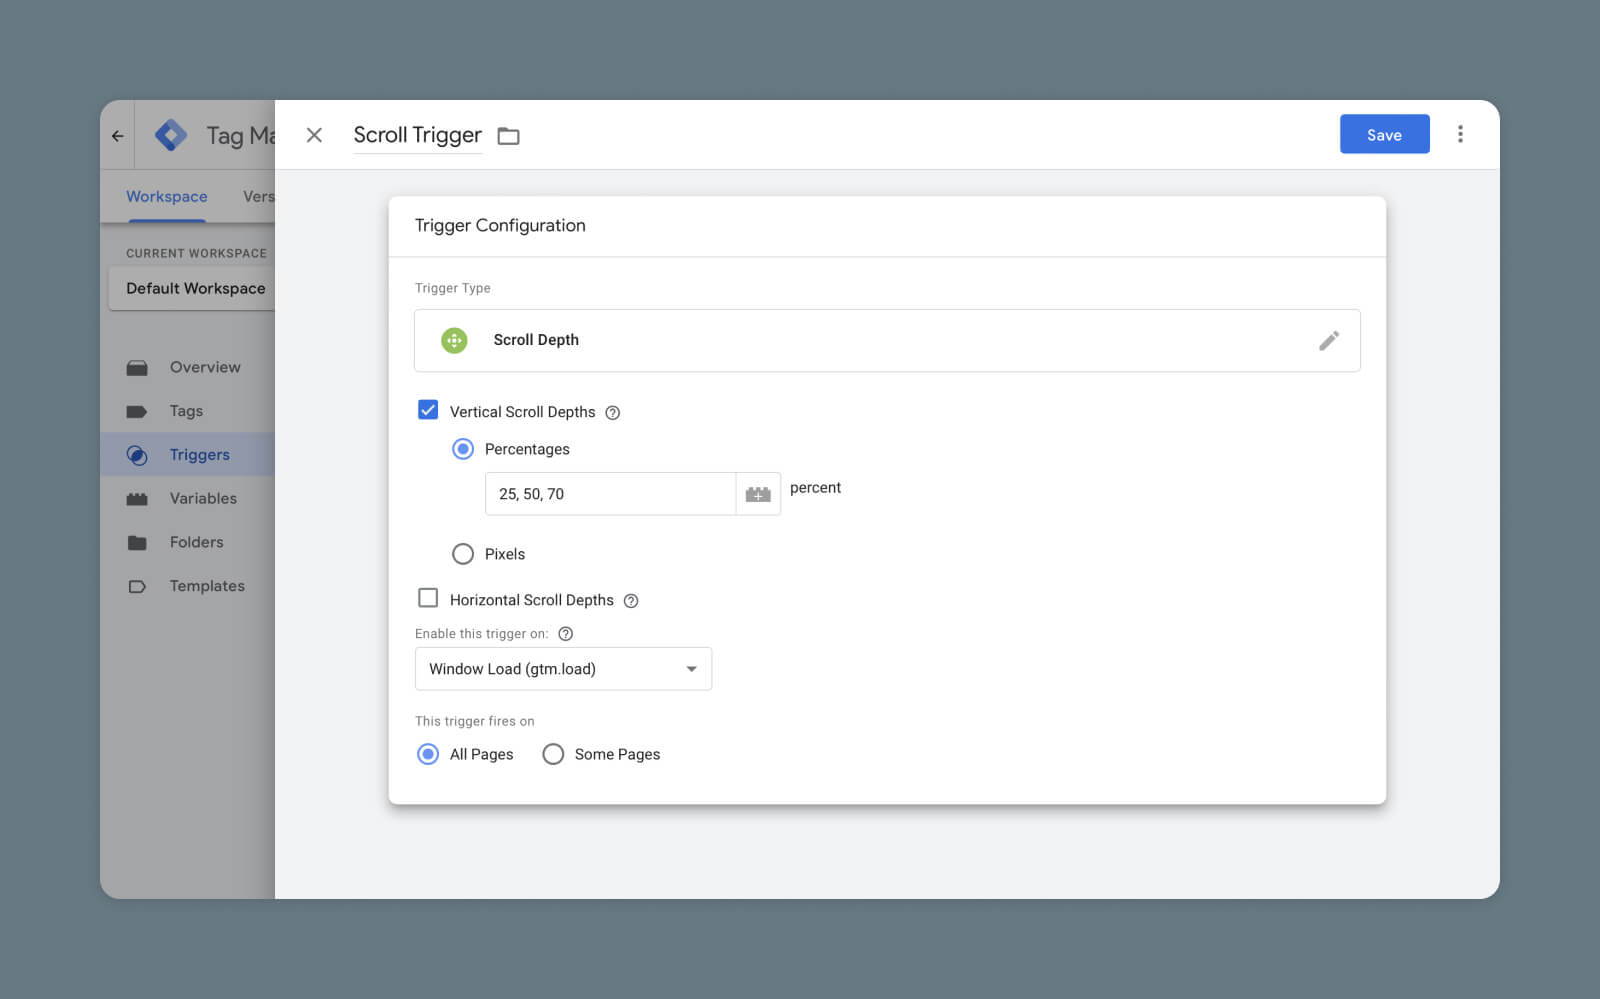
Say you want to measure when a user scrolls 25%, 50%, or 75% down any given page. You’re going to need a new event with custom dimensions.
First, you need to build the trigger. In GTM, select Triggers in the left-hand menu and then hit the New button.
Give the new trigger a name, then tap the Trigger Configuration box. Google lets you choose from a generous array of options here. In this example, you would need to select Scroll Depth.
Next, create a new GA4 event tag by following the process we went through earlier, but this time open the Event parameters section and hit Add row.
Under Parameter name, add the name you want to give to your new dimension. In the Value box, you need to choose a suitable variable for measurement. In this case, you need {{Scroll Depth Threshold}}.
(Can’t see the variable you need? Navigate to Variables > Configure and make sure all the boxes are checked.)
Finally, click the Triggering box and choose the trigger you made earlier. You can now save your new event tag. It’s a good idea to test it, as well.
Your new event should show up in GA4 under the Events section within about 48 hours, and you can click on the name to see all the data collected within the past half an hour.
To see further into the past, you’ll need to register the new event parameter as a custom dimension in GA4.
On the Admin screen, head to Custom definitions under your chosen property and tap the blue Create custom dimensions on the right-hand side.
Fill in the following fields:
- Dimension name – This is how your dimension will appear in reports.
- Scope – Does this dimension relate to an event or a user?
- Description – A place for comments or extra info.
- Event parameter/User Property – Input the exact name of the parameter you just created in your new event.
In a standard account, you can add up to 50 custom event dimensions and 25 user dimensions.
Custom Metrics
Of course, raw data is only useful to a certain extent. To understand exactly how your website or app is performing, it’s a good idea to create some custom metrics that track your custom dimensions.
Don’t worry; this part is a lot easier!
In your Google Analytics Admin area, choose your property and visit Custom Definitions. Next, tap the menu tab labeled Custom Metrics and then tap the blue Create custom metrics button on the right.
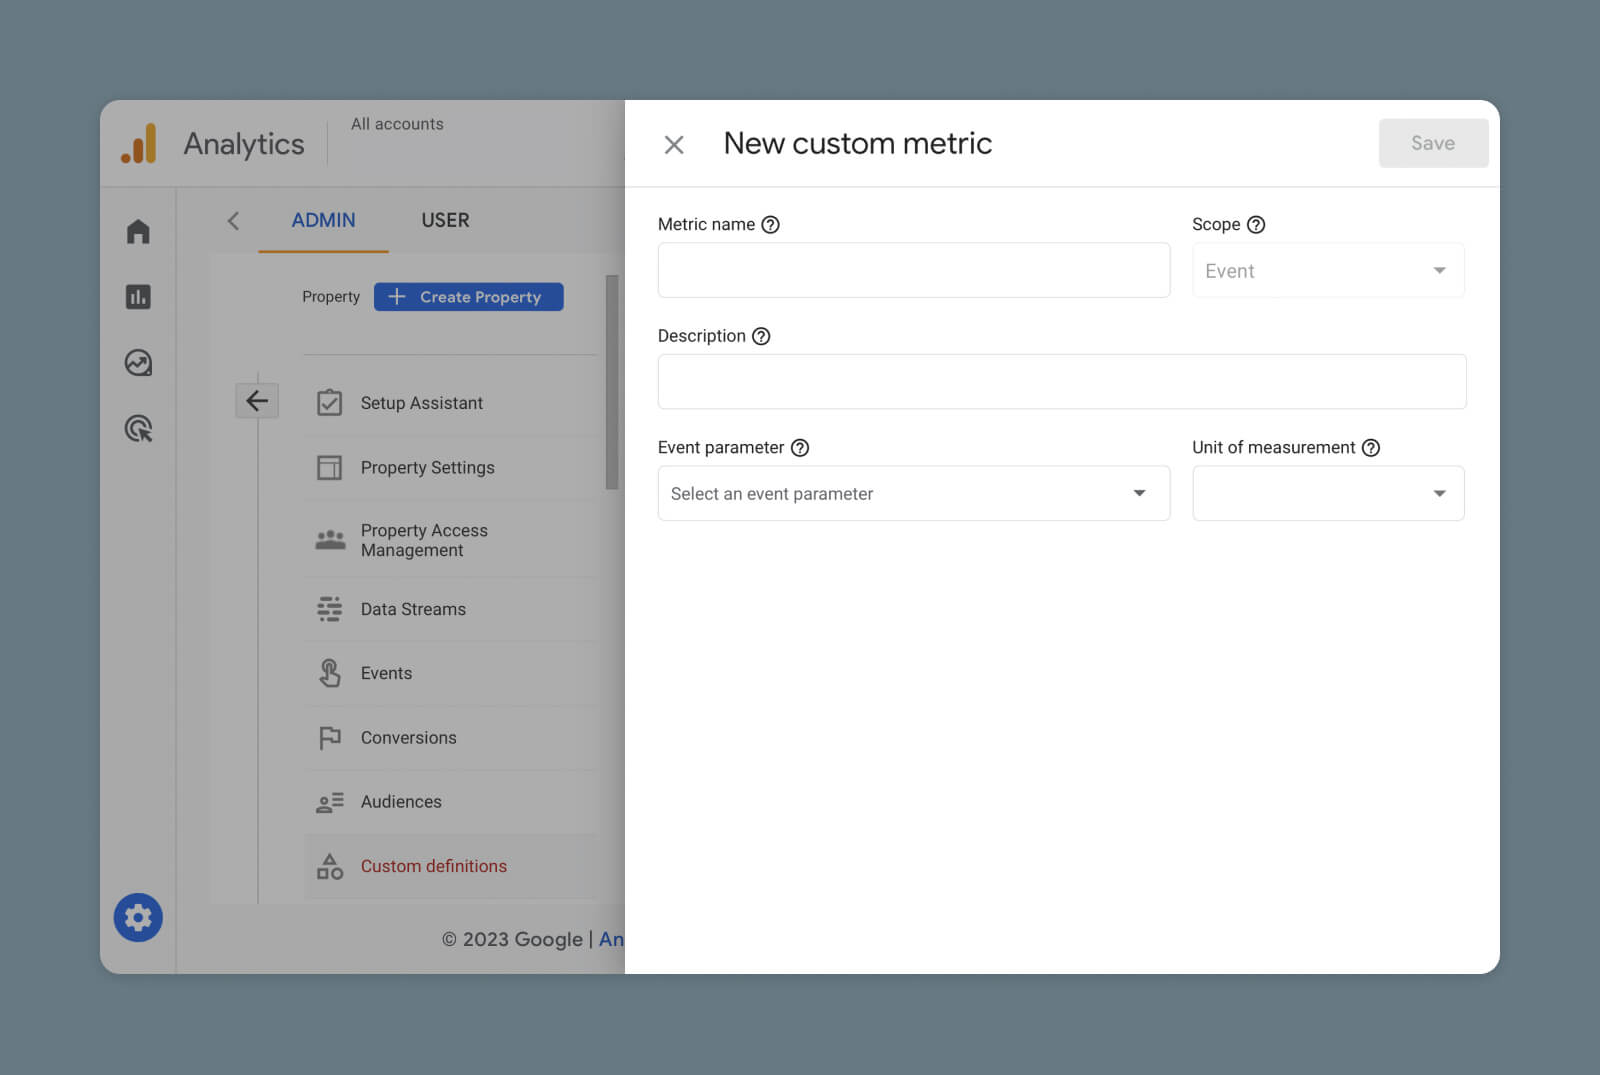
Then, fill out these fields:
- Event name – How your metric will be listed.
- Scope – Event or user.
- Description – Add a comment.
- Event parameter – The parameter/dimensions this metric is tracking.
- Unit of measurement – Choose how you want the incoming data to be measured (integer, time, distance).
Make sure to select the Active checkbox, then hit Save. Within 48 hours, your custom metric should start populating in GA4.
How to Measure Conversions in GA4
While measuring clicks and scroll events can be useful, there is only one thing that ultimately matters to your business or brand: conversions.
Conversion
A website conversion is any action a user takes on a site that moves them further into the sales funnel. Examples include filling out a web form, clicking a call to action, or purchasing a product.
Read More
In Google Analytics 4, tracking conversions is pretty straightforward. All you need to do is identify which existing events count as some form of conversion.
If a particular event has been triggered at least once, you will see the option to Mark as conversion on the right-hand side of the main Events list.
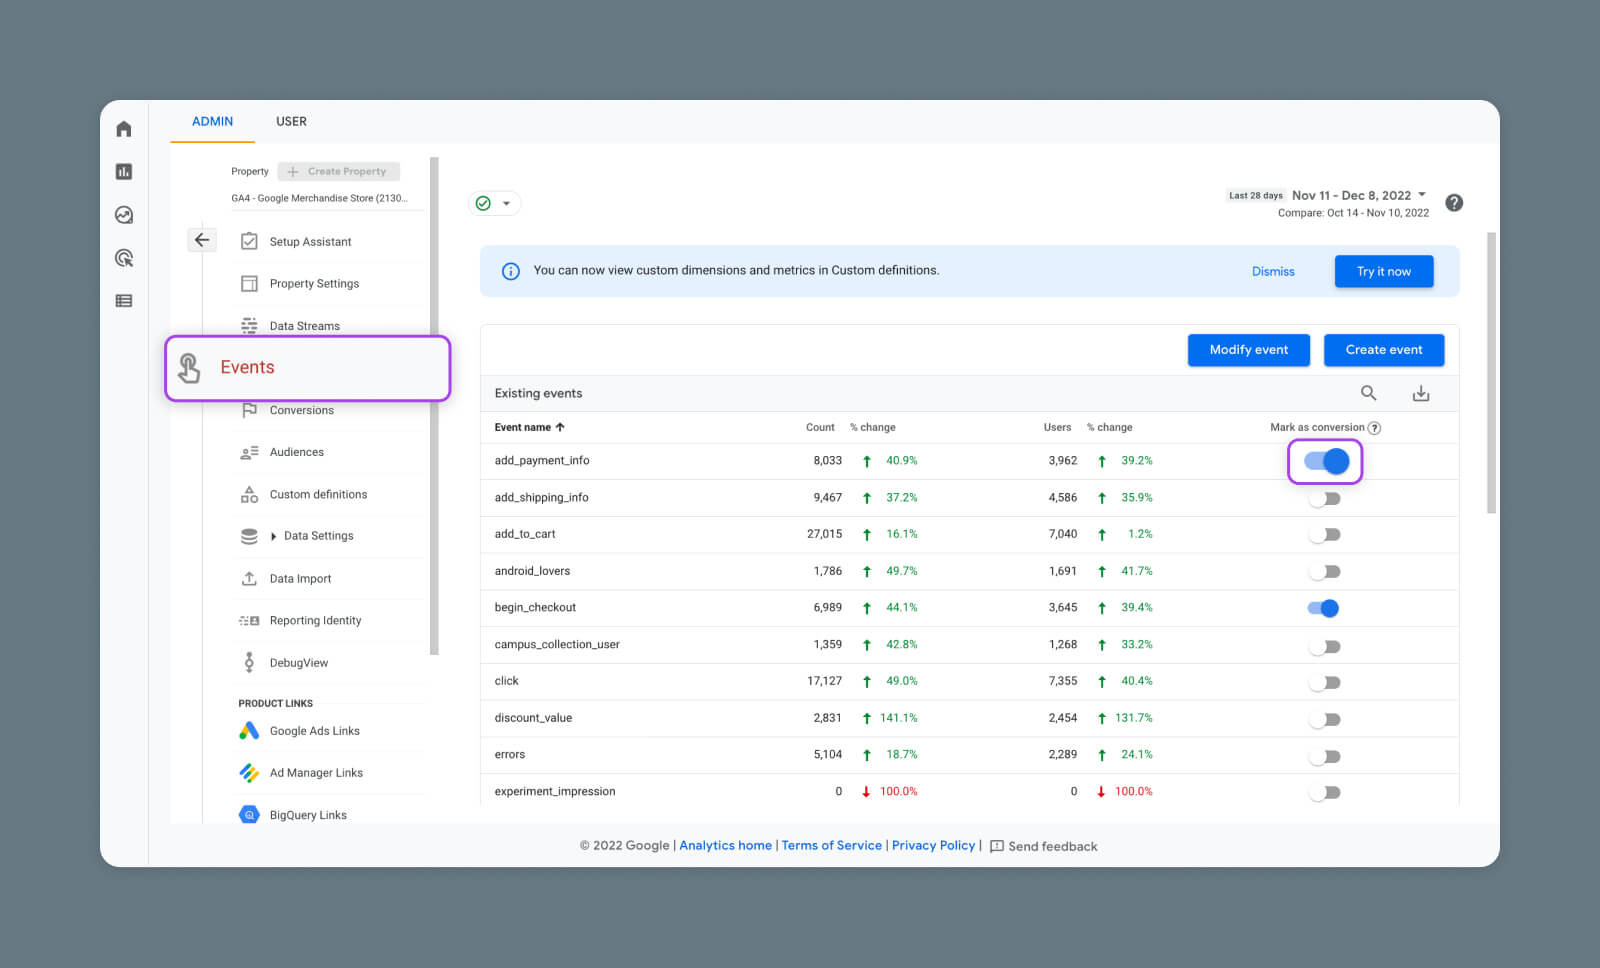
Remember that only events that track pageviews for a specific URL will work properly here. If you don’t already have an event for your confirmation page, be sure to make one using the steps mentioned above.
There is another way to set up conversion tracking for events that have not yet been triggered or haven’t appeared in your events list.
Under the property menu, head to Conversions > New conversion event. Give your new Conversion exactly the same name as the event you want to link. Once your new event goes live, Google Analytics will recognize it as a conversion event.
Testing New Conversion Events
As with any new event, it’s a good idea to verify your conversion events before relying on them.
Simply visit the URL that is your designated confirmation page, and then open up the Realtime view in Google Analytics. If your conversion event shows up, you’re good to go.
Be aware that it might take a while after configuring your event before Google Analytics starts tracking it. Be patient.
Conversion Reports
Whenever you want to check on how many conversions you’re making, just visit the Conversions page in GA4.
Here, you can see which conversions are happening most often, how many users converted through each event, and how much money you’ve made.
You can view a full breakdown of these stats for any conversion in the list by clicking on the name of the event you want to study.
This detailed view also reveals the number of times the event has been triggered in total, and how many times it’s been triggered in the past 30 minutes.
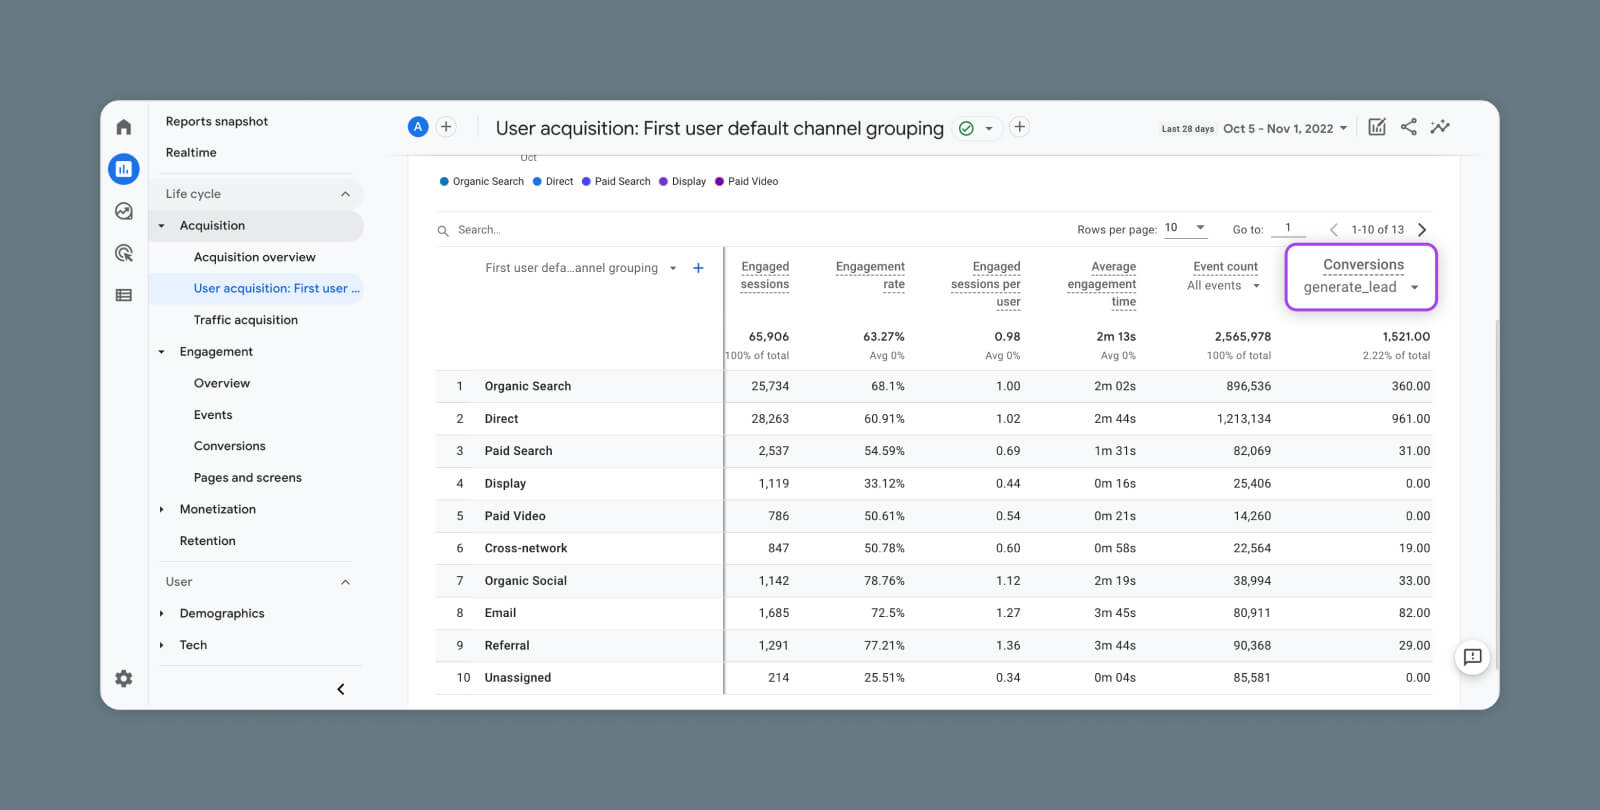
If you want to understand how users make their way to your conversion page, head over to User acquisition and select any conversion event. Google Analytics will then show you which channels are delivering users to your site, and then to that specific conversion.

To trace the exact steps your users are taking, visit Advertising > Conversion paths.
The reporting dashboard here shows you which channels are popular with users at different touchpoints, on their way toward a specific conversion.
Why You Should Set Up GA4 Events
As we have discovered, GA4 makes it possible to track user interactions across every detail of your website or app.
Obviously, setting up all the various events and conversions requires some effort. The bigger your site, the longer the task will take.
But if you want to build an audience or make more e-commerce sales, configuring GA4 event tracking is time well spent. The more you understand your users, the better you can optimize your content.
Get More Visitors, Grow Your Business
Our marketing experts will help you earn more traffic and convert more website visitors so you can focus on running your business.